Simulation and Control
So far we have covered getting a bot into Studio and preparing it: importing a robot, editing its links and joints, composing Mod Bots, and visualizing it. This page covers the last piece: simulating and controlling a bot directly in the Bot Editor.
Simulation in Studio is a debugging and validation aid. Stepping a bot through physics surfaces problems that are hard to spot in a static pose, such as interpenetrating collision geometry, bad inertials, or joints that fight their limits. A built-in pose controller drives the bot's joints so you can validate things like range of motion, joint limits, and self-collisions without writing any code. A force-drag tool lets you grab the running bot with the mouse to perturb and manipulate it, so you can probe how it responds.
Keep the scope in mind. This is a tool for inspecting and validating a single bot, not for authoring or running full scenes, and it is not a substitute for scripting a task in Python. When you need to simulate a whole workcell, drive real controllers, or wire up sensors and actuators, use the SuperDex Robotics API instead, referencing its Examples.
Simulation
Run a bot through physics with the transport controls at the top center of the viewport. There are three:
- Play / Pause starts the simulation, then toggles between running and paused
once it is going. Its shortcut is
Space; the button shows a play icon when the simulation is stopped or paused and a pause icon while it is running. - Step advances the simulation one frame at a time (
Right Arrow) and is disabled while it is playing. Stepping while stopped starts the simulation paused, so you can walk through the opening frames one at a time. - Stop ends the simulation and returns every body to the pose it started from
(
Esc). It is disabled when nothing is running.
Editing is locked while the simulation runs, so the hierarchy and details panels go read-only until you stop.
With nothing driving its joints, a bot simply responds to gravity and contact. Starting a simulation like this is a quick way to watch it settle, sag, or flop, which immediately exposes bad inertials, unexpected joint behavior, or collision problems.
While a simulation runs, the viewport's bottom-left overlay reports Physics in steps per second (SPS), alongside the render frame rate. This number is just the count of simulation steps completed divided by the wall-clock time that elapsed (smoothed over recent samples). Because it is measured against the wall clock, it folds in everything Studio does around each step, including real-time throttling (the deliberate sleep that keeps playback near real time), synchronization between the async physics thread and the main thread, and command-queue processing. It is a throughput measure of Studio's playback, not a measurement of SuperDex Physics' true per-step compute time.
Left-click and drag any link while the simulation runs to grab it. This attaches a critically damped constraint from the link to the mouse position for as long as the button is held, so you can pull the bot around or perturb it and watch how it recovers. The camera controls stay available while you drag, and the scroll wheel moves the target position's depth into and out of the screen. A label at the drag target shows the constraint's current force in newtons.
Physics Settings
Open Window > Physics Settings to configure the scene the bot simulates in.
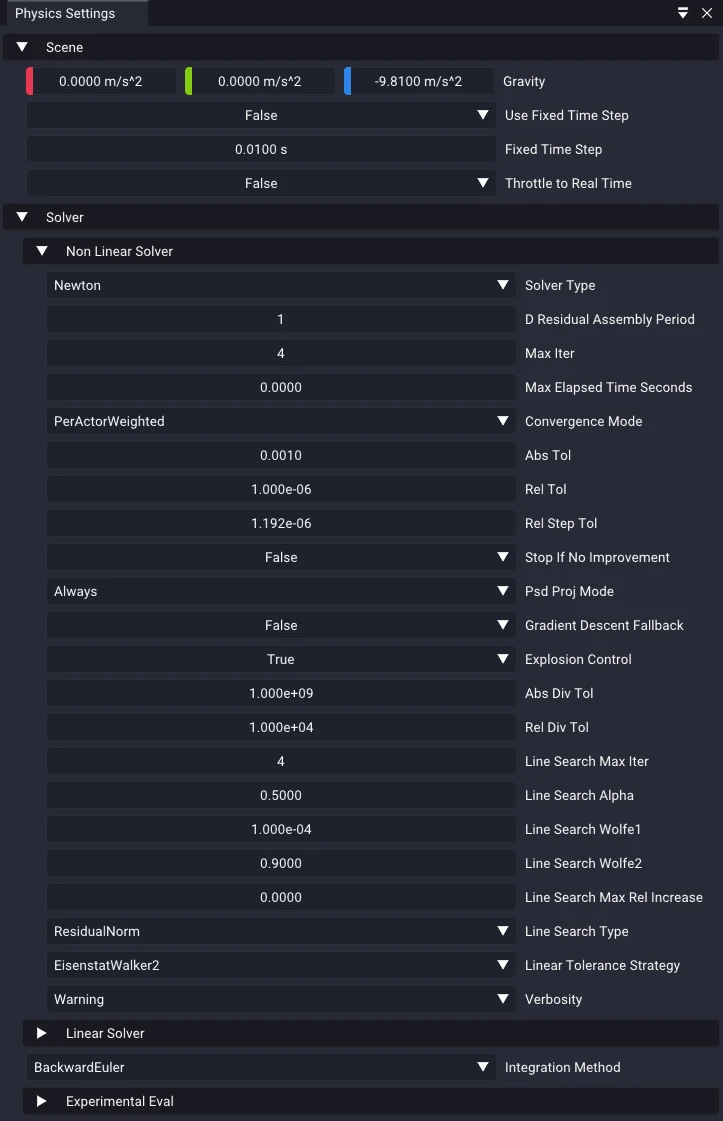
Under Scene you can set Gravity and choose how time advances. By default an editor runs an async scene: physics steps on its own thread and keeps pace with the wall clock, so the step size varies with real time and runs are not bit-for-bit reproducible. Enable Use Fixed Time Step to advance a constant Fixed Time Step each step instead, which is deterministic and repeatable; with a fixed step, Throttle to Real Time paces playback to the wall clock rather than running as fast as the machine allows.
The Solver section digs deeper, exposing the Non Linear Solver and Linear Solver parameters that govern how each step is solved. These are advanced controls and are best left at their defaults unless you know what you are tuning.
The values in the Physics Settings window are seeded from Studio's default physics settings under File > Settings > Physics, which every newly opened editor starts from. Change them there for a persistent change to the default simulation settings across Studio; the per-editor window affects only the current editor.
Control
Once a simulation is running, the Bot Control window drives the bot. It offers three tools that combine freely: emulated gravity compensation, a pose controller, and direct effort commands. Open it from the Window menu if it is not already docked.
Gravity Compensation (Emulation)
Gravity Compensation simply spawns the bot with gravity disabled on every link. It is not a controller, and nothing computes compensating torques. It just removes gravity so you can see how the bot would behave under an ideal gravity-compensating controller, without it sagging under its own weight. Because gravity is baked in when the bot spawns, this cannot be toggled while a simulation is running.
Pose Controller
The Pose Controller holds the bot at a target pose. It is Studio's exposure of
SuperDex Robotics'
ControllerMochiArticulatedPose,
itself a wrapper around SuperDex Physics' built-in implicit (PD) articulated-pose
controller. Enable it, which you can do at any time during a simulation, then drag
the per-DOF sliders to command a target pose. Each slider is bounded to its joint's
limits when they are defined, and falls back to an unbounded drag when they are not.
Tuning is deliberately minimal, since this is a debugging aid rather than a controller-authoring tool. A single bot-wide Closed-Loop Bandwidth knob sets the response: gains are derived from the bot's own mass properties for a critically damped response at that frequency. Configuration-Dependent Gains recomputes those gains every step from the bot's mass matrix so they follow each joint's changing effective inertia; with it off, the gains stay frozen at the spawn pose.
Use Export Controller... to save the built controller as a
.superdex_controller file. Treat this as a first pass, a reasonable starting point
to be refined with proper tuning. For how to load and run an exported controller
from code, see the SuperDex Robotics
IK + Pose Control
example.
Effort Control
Effort Control applies raw effort commands, the torques and forces on each degree of freedom, either on their own or on top of the pose controller and gravity compensation. Drag a DOF's slider to command its effort. When a joint defines an effort limit, its slider is bounded to that range; joints with no limit use an unbounded drag, and non-actuated joints (an effort limit of zero) are disabled.