Prefab Editor
The Prefab Editor is where you build a prefab: place actors, give them
collision and render geometry, decide what collides with what, then press
Space and watch it behave. This page covers what a prefab can hold, which
panel edits which part of it, and how to arrange actors with ease.
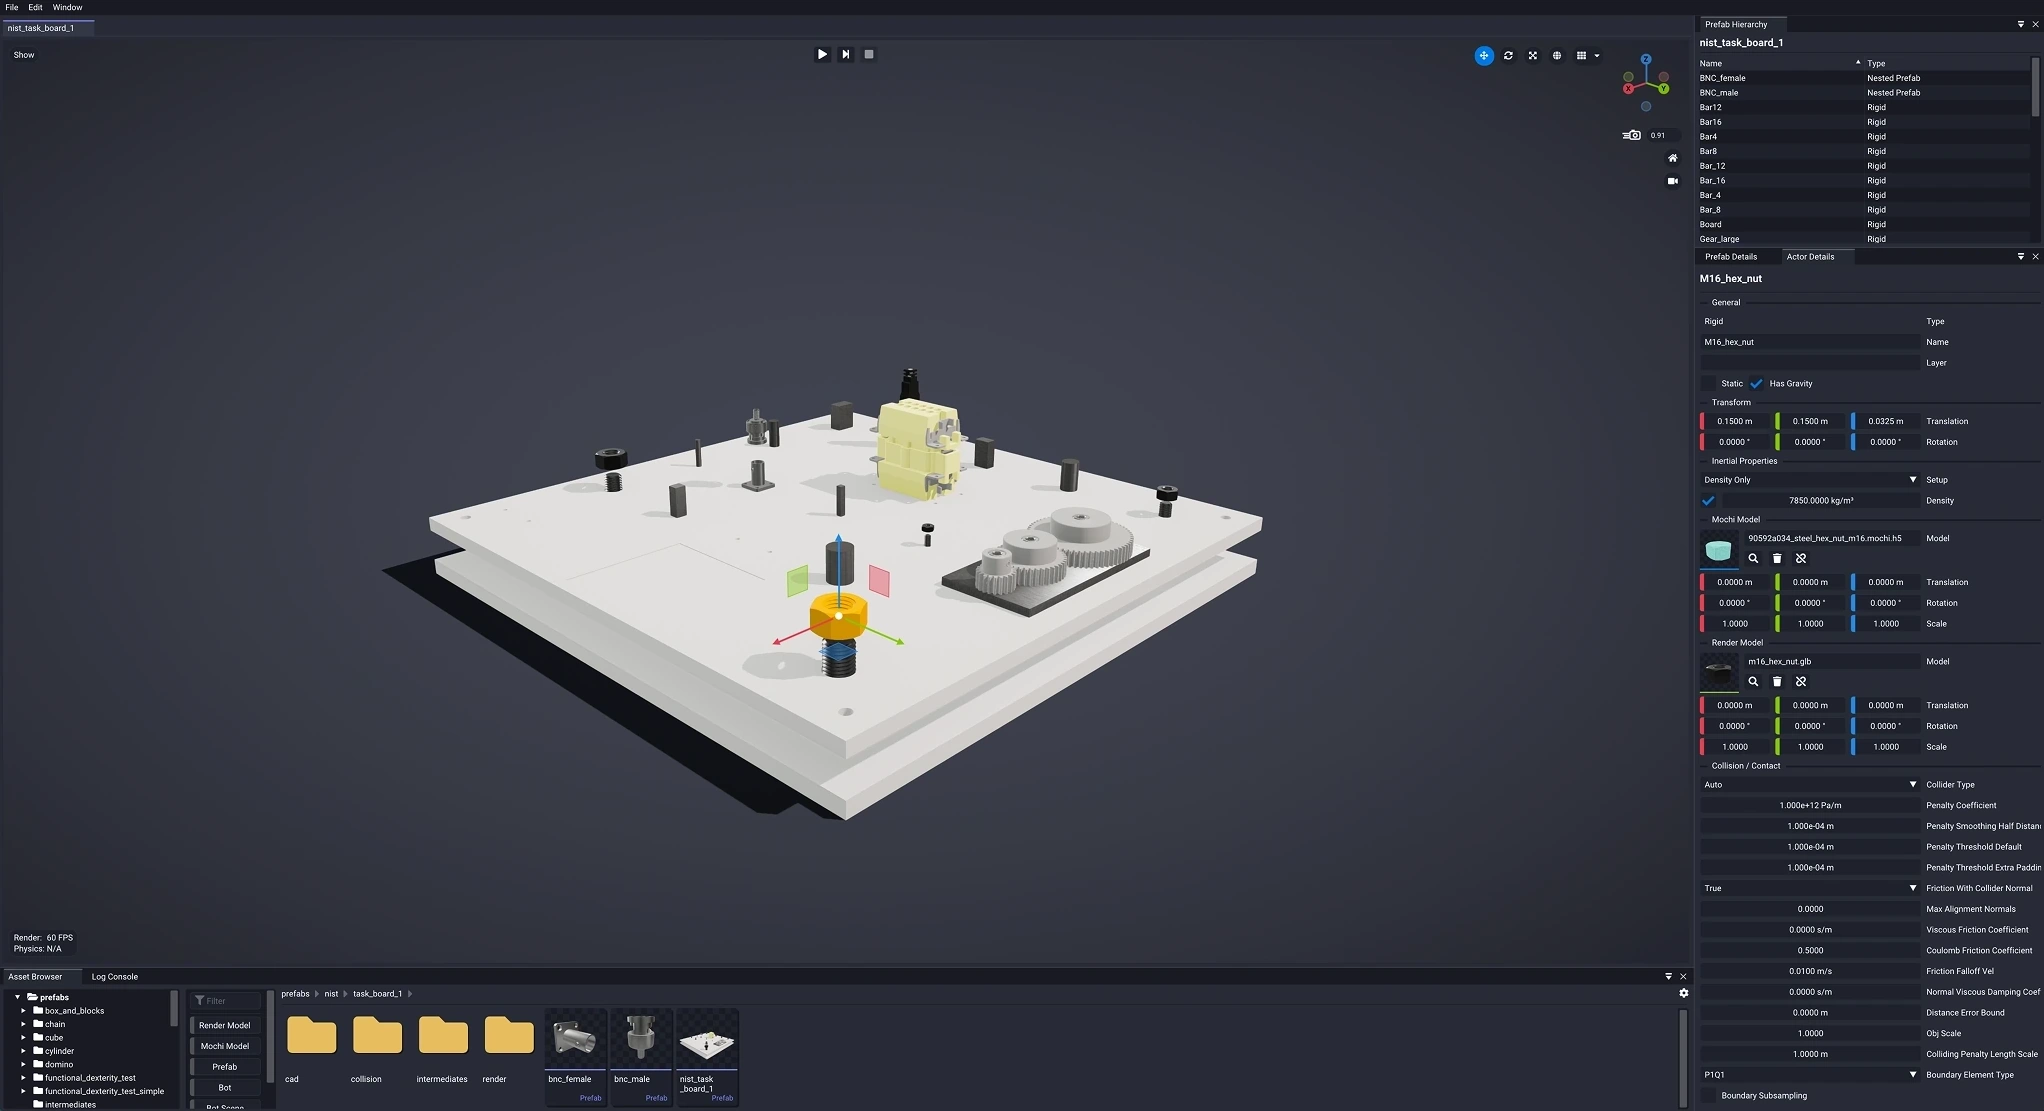
What Is a Prefab?
A prefab is a scene of physics actors saved as one reusable asset, written as JSON. Prefabs are the blocks you compose environments from: a tabletop, a fixture, a bin of parts, a task board. A prefab can hold another prefab by reference, so you can build small, combine, and reuse.
What you author here is the simulated scene, including the render mesh for visuals and collision mesh for physics. The camera, the transform gizmo, and the playback transport are app-wide and are covered in User Interface.
Anatomy of a Prefab
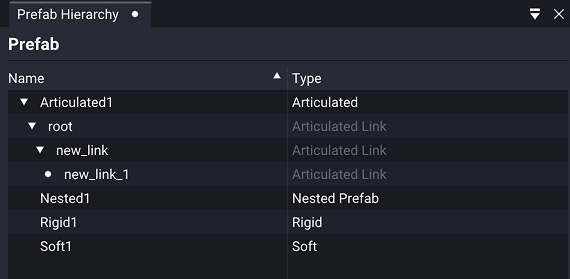
A prefab is a flat list of actors of four kinds. Pick the kind by what the part has to do, then author it in Actor Details, which changes its sections to match whatever you have selected.
| Kind | Use it when |
|---|---|
| Rigid | The part does not deform and currently is the most used type. |
| Soft | The part is compliant and hence squashes, bends, and conforms. |
| Articulated | The part has moving pieces joined by constraints: prismatic, revolute, spherical, or hard (e.g., hinged lid, drawer, vise). |
| Nested Prefab | You include an existing prefab inside another. |
Feature Support
Those four kinds are what a prefab can hold today. The prefab format can express more than this editor can currently author, so here is where the line falls.
Supported
- Rigid, soft, and articulated actors, and nested prefabs, as described above.
- Collision and render models per actor, each with its own scale and offset.
- Inertial properties, either derived from the collision geometry or given outright.
- Joints within one articulated actor: prismatic, revolute, spherical, and hard, plus an optional skin.
- Contact filtering by actor pair or by layer.
- Scene settings: gravity and solver, on a scene prefab.
- Constraints between separate actors, such as pinning two rigid actors together. Model the pair as one articulated actor in the meantime.
- Pose controllers for articulated actors.
- Soft-skinned actors, which are neither listed in the hierarchy nor drawn in the viewport.
- Closed-loop articulations and initial joint velocities.
- Tendons, shells (cloth), and rods, which the prefab format itself cannot express yet, so those need format work before Studio can author them.
These already simulate in SuperDex Physics. Constraints and pose controllers already present in a file survive a save and still simulate; you just cannot see or edit them here. Closed-loop articulations are the exception: adding, deleting, or reparenting a link drops that actor's cycles and joint velocities.
Editor Windows
The Prefab Editor adds four windows to the Studio frame. Three are open by default; the Contact Filter is not, and you open it from the Window menu.
| Window | What you do there |
|---|---|
| Prefab Hierarchy | Create, select, duplicate, and delete actors. Sortable by name or type. |
| Prefab Details | Settings for the prefab as a whole. See Scene Settings. |
| Actor Details | Everything about the selected actor. Its sections change with the actor kind. |
| Contact Filter | Which actors and layers are allowed to collide. Hidden by default. |
There is no separate simulation window. You can use the play button at the top of the viewport, described in User Interface.
Scene Settings
Prefab Details currently only contain a Scene Prefab toggle. Turning it on attaches a block of scene settings to the prefab, covering gravity and solver configuration. Turning it off strips them again.
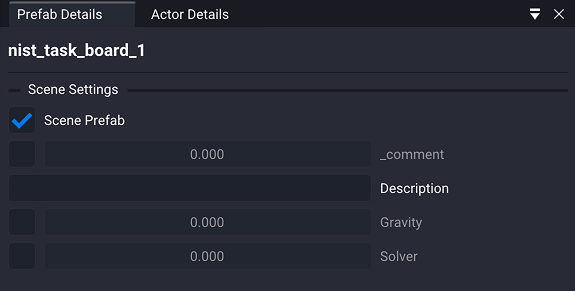
Scene settings only apply to the prefab at the top of the tree. Nest a scene prefab inside another prefab and its gravity and solver settings are ignored in favor of the outer one's. Turn the toggle on for a prefab that is the environment, and leave it off for one meant to be dropped into something larger.
By convention these are saved as .mochi_scene and .mochi_prefab
respectively, but that is only a naming habit. Both open in the Prefab Editor,
and the Scene Prefab toggle converts one into the other.
Rigid Actors
A rigid actor is a single body that does not deform, and currently it is likely most of what you will author. It includes two model slots that are essential:
- The collision model (
.mochi.h5) is what the solver actually simulates. - The render model (
.glb) is what you see, and it has no effect on physics.
The two carry independent scale and offset, and the editor cross-wires them so adjusting one keeps the other aligned. A rigid actor also carries a Static flag for geometry that should not move, such as a table or a wall, and a Layer name used by the Contact Filter.
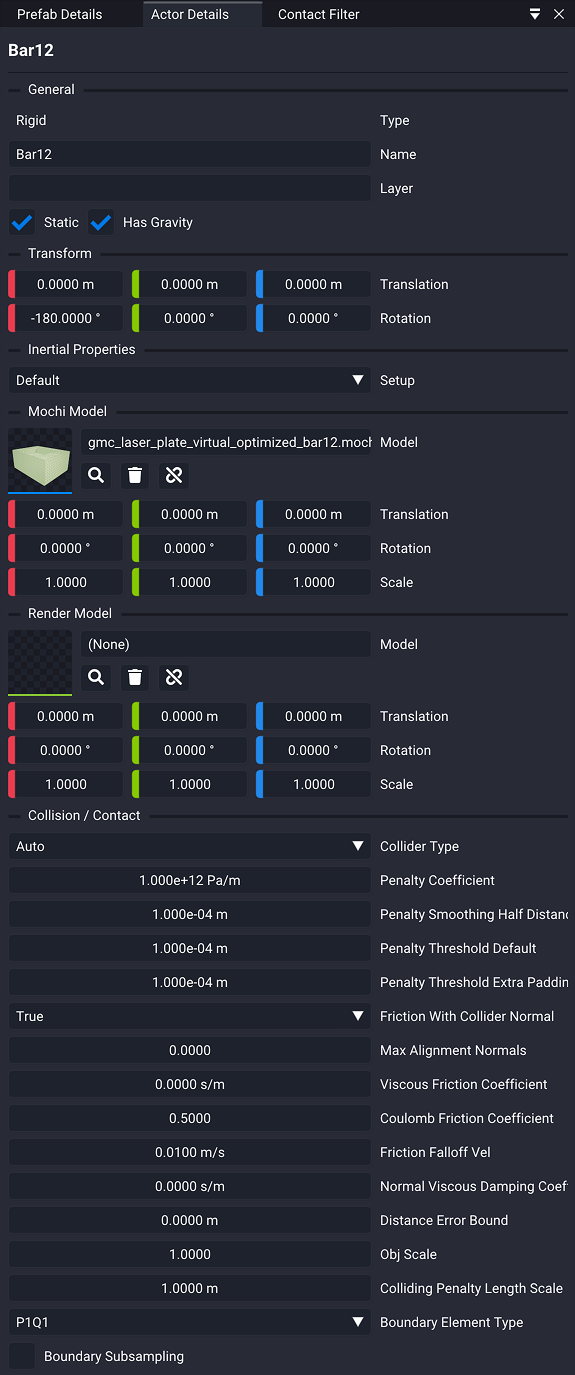
*The collision model slot is still labeled Mochi Model in the app. That string is being renamed.
Contact and material parameters sit at the bottom of the panel. They mean the same thing here as anywhere else in the physics engine, so the full property reference lives in Authoring Prefabs rather than being repeated here.
Inertial Properties
Mass, center of mass, and the inertia tensor decide how a body responds to force. You rarely want to type all of them (especially if you know mass or density of your simulated objects). The Setup dropdown picks how much you specify and how much Studio derives from the collision geometry.
| Setup | You provide | Derived from geometry |
|---|---|---|
| Default | Nothing | Mass, center of mass, and inertia, using a default density |
| Density Only | Density | Mass, center of mass, and inertia |
| Mass Only | Mass | Center of mass and inertia |
| Mass, COM, MOI | All three, explicitly | Nothing |
| Density, COM, MOI | Density, center of mass, and inertia | Mass |
Soft Actors
A soft actor deforms. It takes the same collision model slot as a rigid, but Studio rebuilds a surface mesh from it, which is why changing the shape or its scale is a heavier edit than moving a rigid around.
Soft actors have no render model slot. What you see is the simulated surface. They also carry their own material, separate from the contact parameters, and three behavior toggles worth knowing: Has Gravity, Has Inertia, and Has Stress.
Soft bodies cost considerably more to simulate than rigid ones. Use one when the deformation is the point, and a rigid everywhere else. The material models and their parameters are documented in Authoring Prefabs.
Articulated Actors
An articulated actor is a hierarchical tree of links joined by joints, authored as a single actor. Use one for anything with moving parts that stay attached: a hinged lid, a drawer, a vise, a door.
Its row in the Prefab Hierarchy expands into the link tree, and selecting a link inside it fills Actor Details with that link's joint and body properties. Beyond structure, an articulated actor carries an optional Skin, a render model deformed by the links underneath it.
This page covers creation of articulations for simple objects without controller. The field-by-field reference for joint limits, dynamics, and drives lives in the Bot Editor Guide, which is the same editing model.
Nested Prefabs
A nested prefab is another prefab placed by reference, with its own transform. It is not a copy: the nested asset stays a separate file, and the reference is what gets saved. Build simpler Prefabs once and nest it wherever it is needed. Fixes in the original Prefab will be picked up by its nested versions.
Contact Filter
By default every actor can collide with every other actor. The Contact Filter is where you define a collision matrix, and it is a good place to look when two parts interpenetrate at rest or a mechanism jams on itself. A prefab has no contact filter until you add one. Open Contact Filter from the Window menu and press Add Contact Filter. The window then offers two ways to express a rule:
| Tab | Scope | Use it for |
|---|---|---|
| Actors | One named actor against another | You want to define the contact matrix for a specific pair only |
| Layers | One layer against another | A whole class of parts at once |
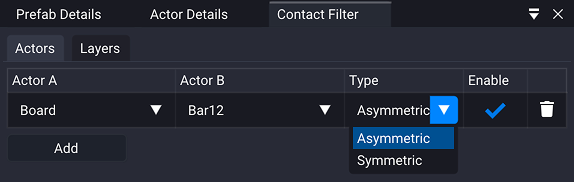
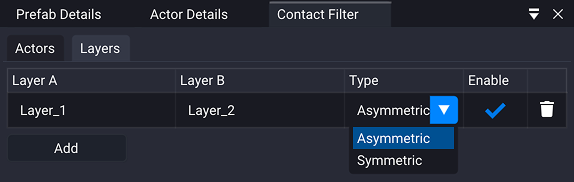
Layers are the scalable half. Every rigid and soft actor has a Layer field in Actor Details, directly under Name; type the same layer name on a group of actors and one layer rule then covers all of them. That is the difference between one rule and forty.
Rules come in two directions. A symmetric rule means both sides respond to each other, which is what you usually want. An asymmetric rule is one-way: the first side is affected by the second, but not the reverse. New rows are created asymmetric, so if a pair is behaving oddly in only one direction, check that first.
Placing, Duplicating, and Snapping
Right-click empty space in the Prefab Hierarchy to create an actor: Create
Rigid, Create Soft, Create Articulated, or Create Nested Prefab.
Right-click an existing row to copy, duplicate, or delete it.
The Prefab Editor is the only editor with multi-selection. Ctrl-click to add
or remove one actor, Shift-click to take a range, then move the whole
selection with the transform gizmo.
| Action | How |
|---|---|
| Duplicate in place | Right-click the row, then Duplicate |
| Duplicate while dragging | Hold Alt and drag the selection with the gizmo |
| Delete | Delete, or the Right-click menu |
| Add to the selection | Ctrl + Left-click |
| Select a range | Shift + Left-click |
Snapping to the Grid
The transform gizmo can snap to fixed increments, set from the grid button in
the viewport toolbar. Each gizmo mode keeps its own increment, so translate can
snap to 0.01 m while rotate snaps to 15°. Holding Ctrl mid-drag inverts
whatever the setting is, which is the fastest way to place one actor off-grid
without turning snapping off and back on.
Snapping is what makes a regular array of parts quick: set an increment, then
Alt-drag a copy and it lands exactly one step over.
Copy and Paste Between Prefabs
Copy and paste go through the system clipboard rather than an internal buffer, so they work between two prefab tabs, and between two Studio windows. Copy an actor in one prefab, switch tabs, and paste it into another.
An actor carries its geometry references, transform, and physics settings with it. It does not carry anything outside itself, so a pasted actor lands without the contact filter rules that used to apply to it.
See Also
- User Interface: the viewport camera, the gizmo, and the playback transport.
- Bot Editor Guide: the field-by-field joint and link reference.
- Model Editor Guide: building the collision models a prefab binds.
- Prefabs: the concept, as the physics engine defines it.
- Authoring Prefabs: the full property reference for actors, materials, contacts, and scene settings.