Importing
Importing is the most common way to create a bot in Studio. Rather than
authoring a robot from scratch, you bring in an existing robot description and
let Studio convert it into a native .superdex_bot with preprocessed render and
collision assets.
Studio ships with a URDF importer today, and support for additional robot
description formats is planned. This guide walks through importing a .urdf
file and the options available along the way.
Import Methods
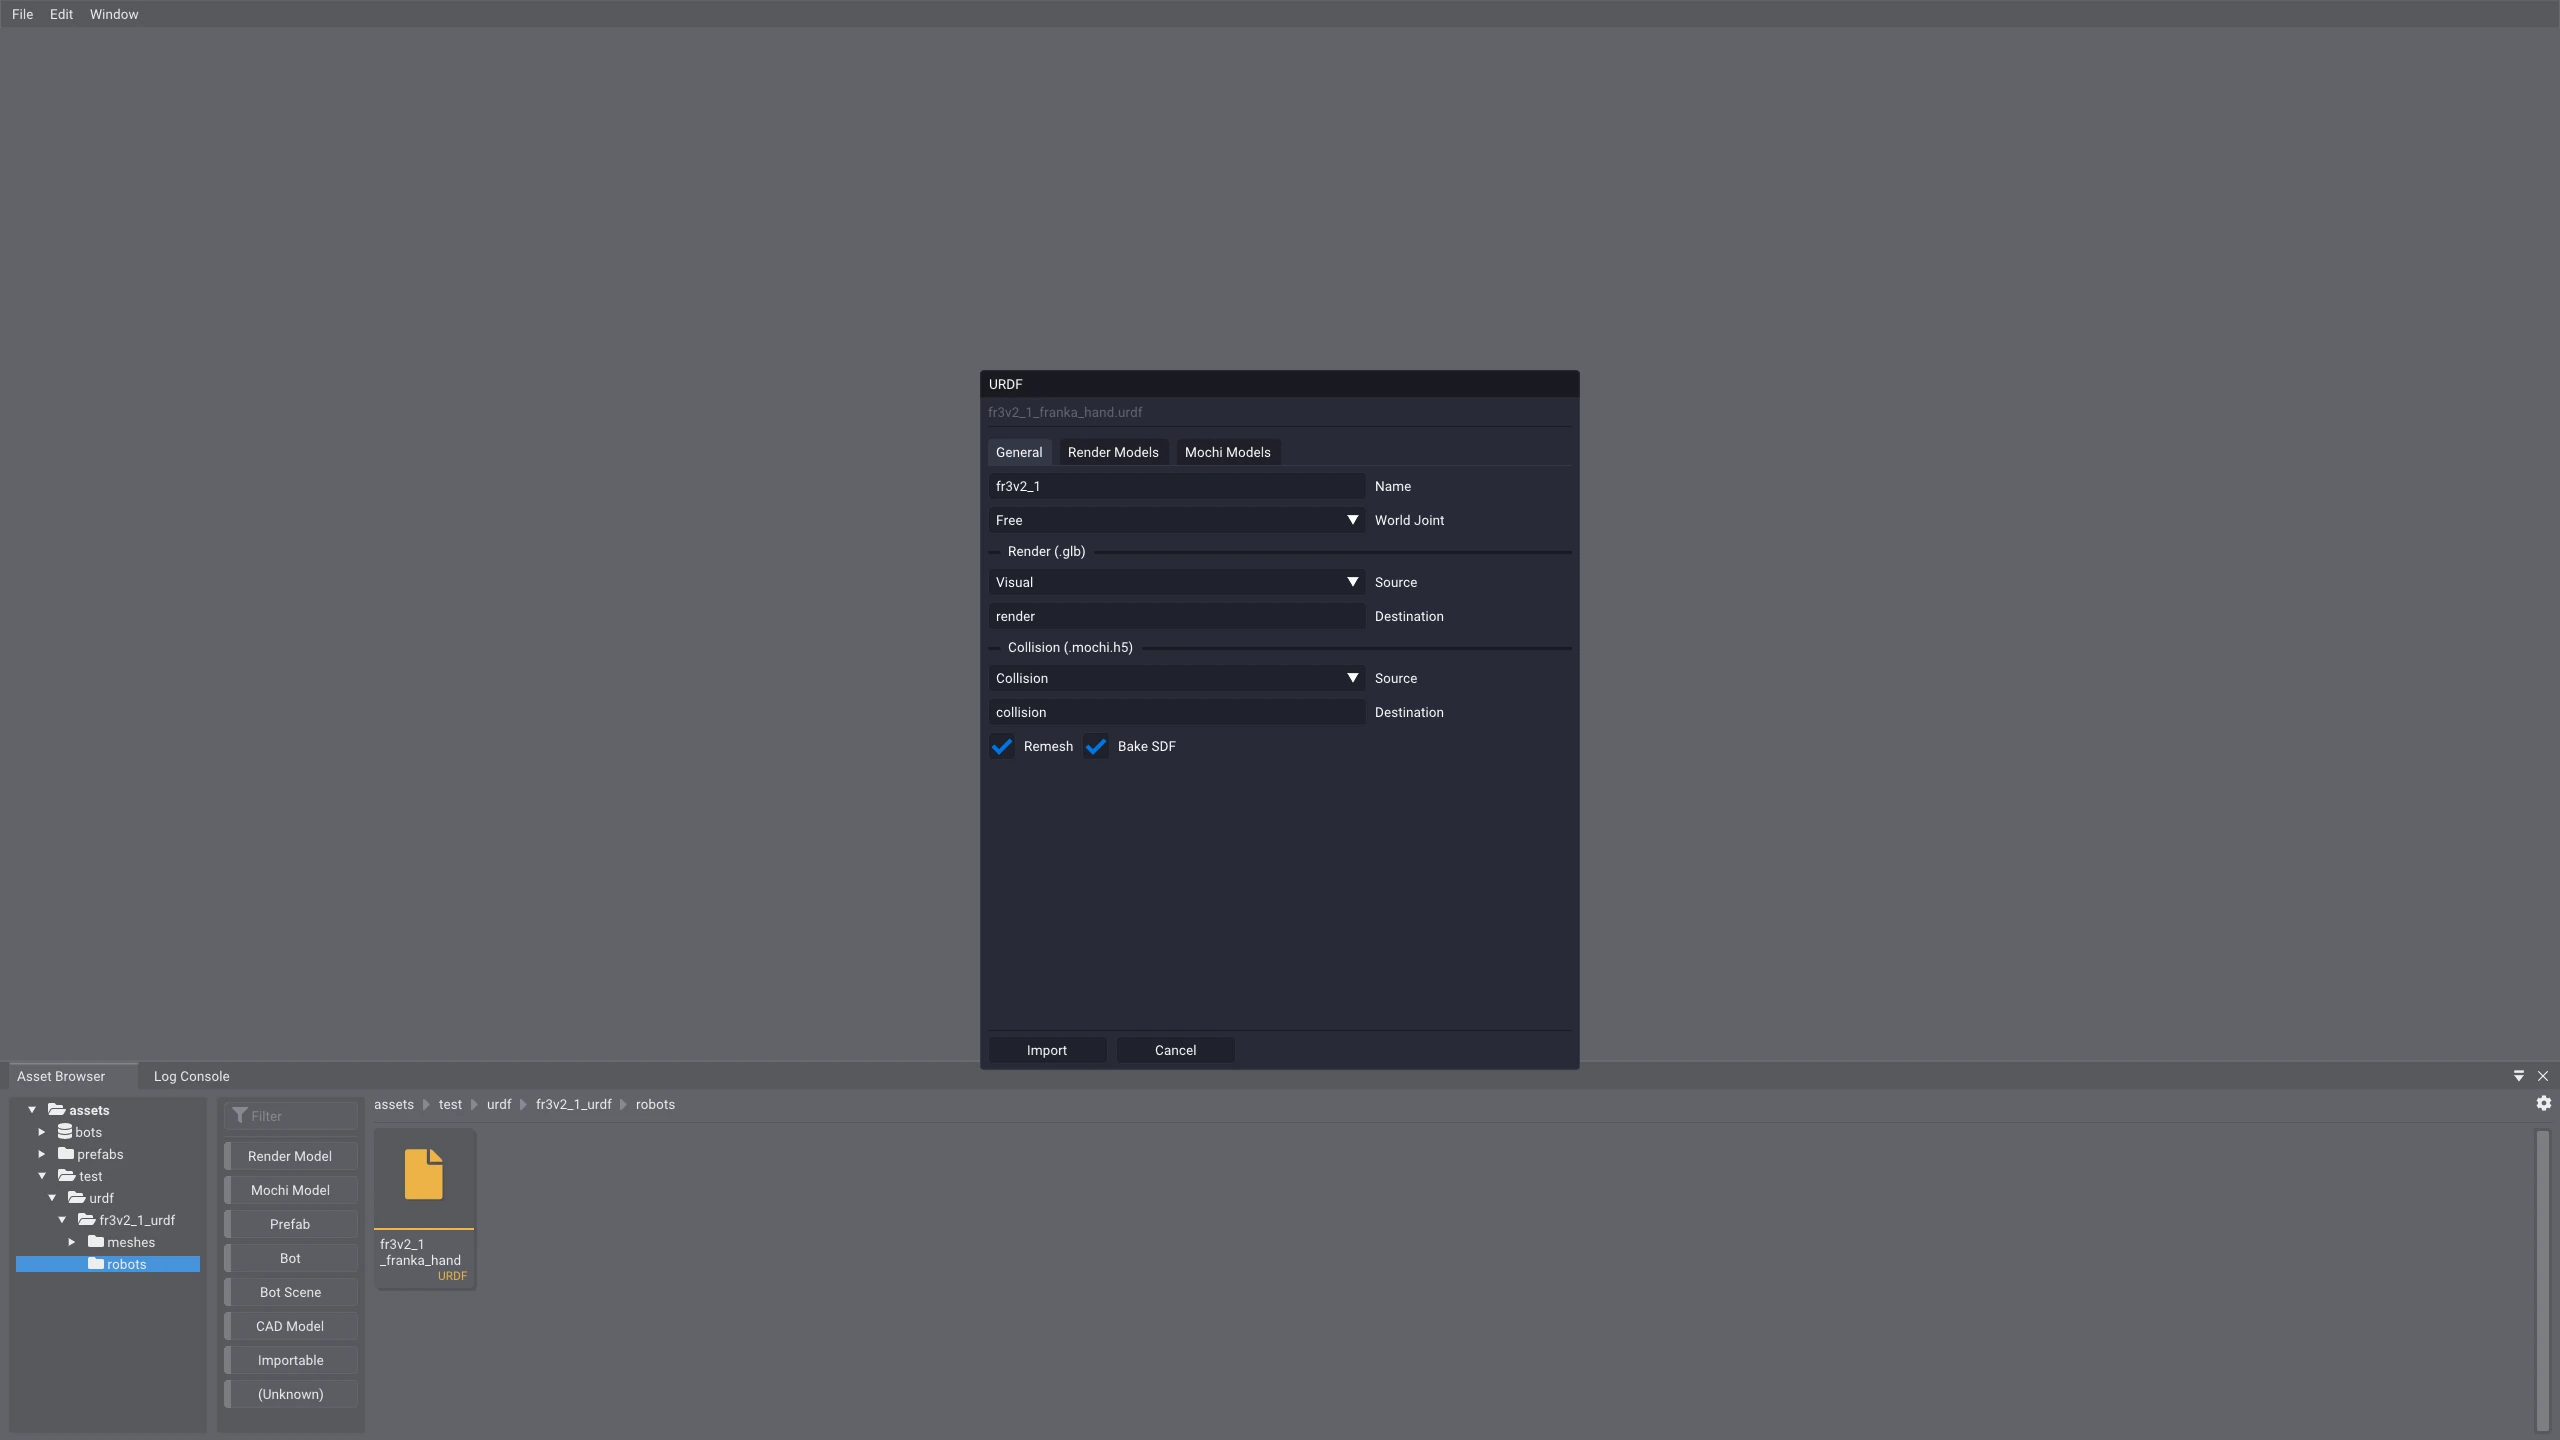
There are three ways to start an import. All of them open the same import wizard and write the resulting bot into the Asset Browser's current directory.
| Method | How |
|---|---|
| Drag and drop | Drag a .urdf file from your file manager onto the Studio window. |
| File menu | File → Import → URDF..., then pick the file in the dialog. |
| Asset Browser | Double-click an un-imported .urdf shown in the Asset Browser. |
The third method requires Show Importable Files to be enabled — it lives in the Asset Browser's settings cog, and is on by default. With it enabled, files Studio knows how to import appear alongside your assets and can be imported in place, without leaving the browser.
Import Options
General
The General tab is the one-stop shop. Everything a typical robot needs is here, applied in bulk across every link, and for most URDFs you can set these few fields and hit Import.
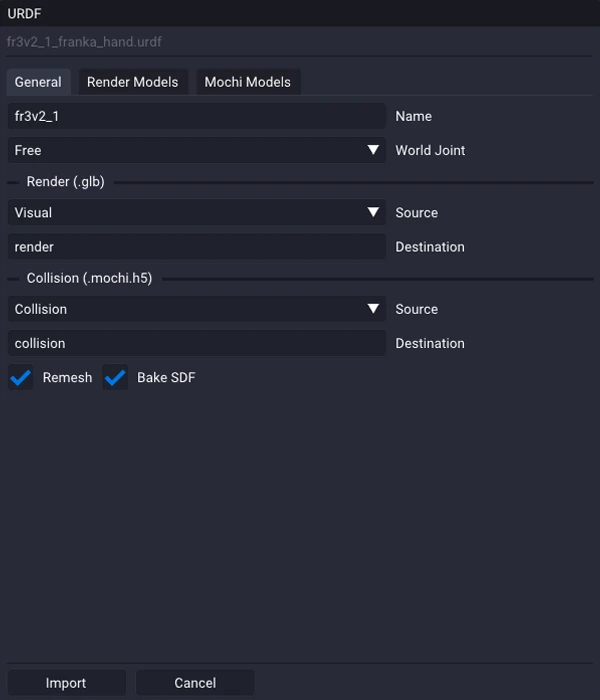
Name is the output bot name, producing <name>.superdex_bot. It defaults to
the robot name declared in the URDF, made unique against what is already in the
destination folder. You can override it freely; if you type a name that would
overwrite an existing bot, the field turns red and Import is blocked.
World Joint sets the joint that attaches the bot's root link to the world, and is limited to two choices:
| Choice | Meaning |
|---|---|
| Free | A 6-DoF joint. The bot has a floating base and is free to translate and rotate — use this for mobile bases, humanoids, and anything that should fall or be pushed around. |
| Hard | A 0-DoF weld. The root link is rigidly pinned in place — use this for a fixed-base manipulator bolted to a table. |
Render and Collision sources
A URDF link describes its geometry twice: a <visual> mesh for display (usually
COLLADA .dae) and a <collision> mesh for physics (usually .stl). Studio
keeps the same split, but in its own preferred formats — .glb for render
models and .mochi.h5 for collision models.
Each section has a Source picker choosing which URDF slot to pull from for every link, and a Destination subfolder for the generated files (blank writes into the bot's folder directly):
| Section | Source default | Destination default | Output |
|---|---|---|---|
| Render | Visual | render | .glb |
| Collision | Collision | collision | .mochi.h5 |
Studio converts as needed: a source that is already in the target format is copied through untouched, and anything else is converted. Coordinate spaces are handled for you — render and physics use different conventions, and the importer applies the right transform based on the source format.
Only <mesh> geometry is imported, and only one mesh per slot:
- Primitive shapes.
<box>,<cylinder>, and<sphere>geometry is skipped. A link whose<collision>is a primitive has no collision mesh to draw from, so the importer falls back to that link's visual mesh instead. - Multiple mesh definitions. A link may legally declare several
<visual>or<collision>elements, but only the first mesh-bearing one of each is used. The rest are dropped.
URDF collision meshes are very often convex stand-ins for the real part. Below is the same Robotiq gripper imported twice — once with Collision as the collision source, once with Visual:
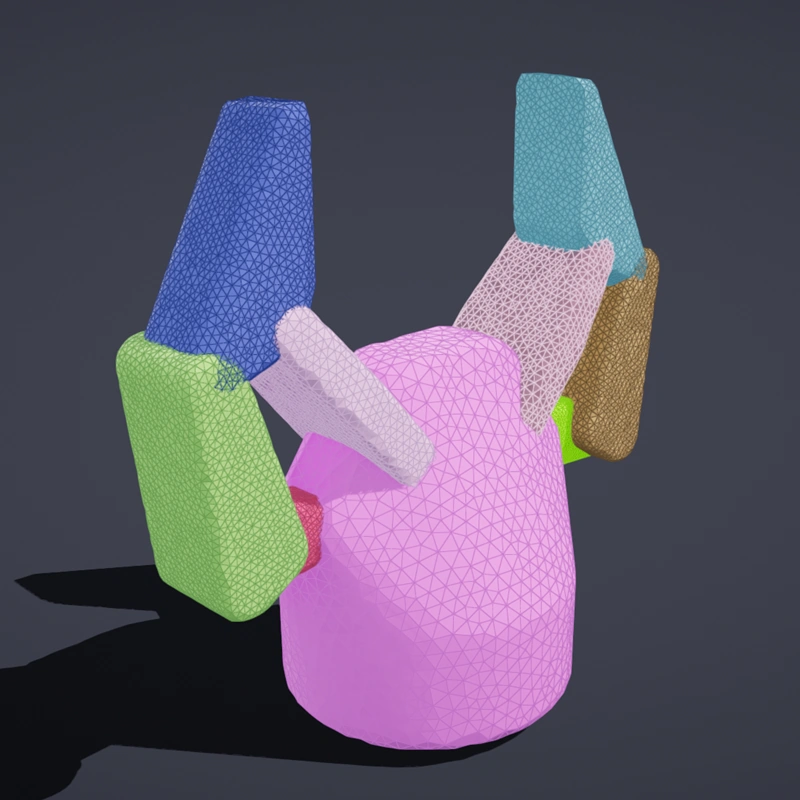
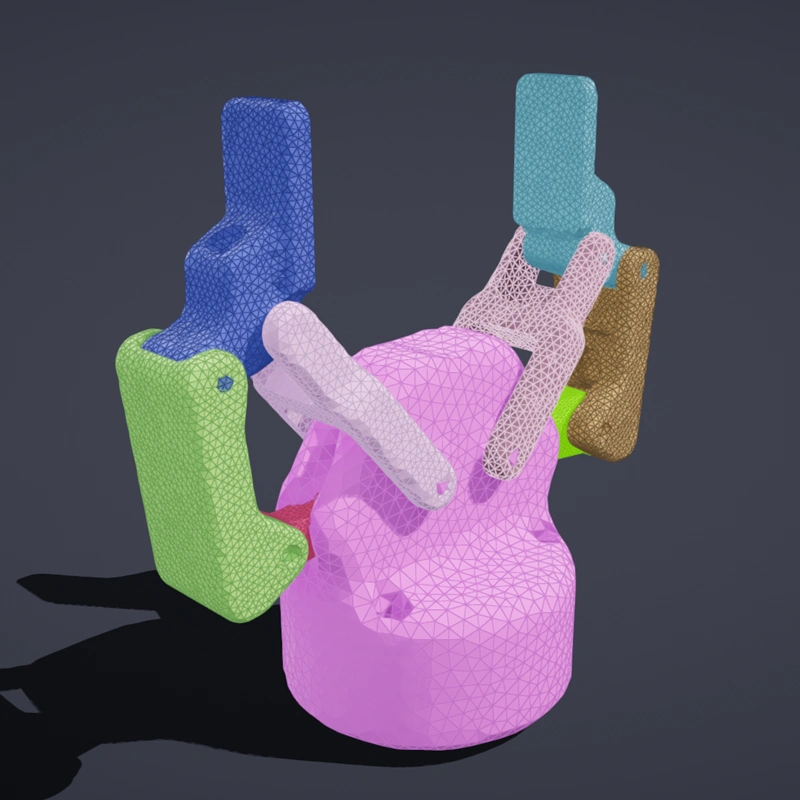
Notice what the convex hulls lose: the hooked fingertips fill in flat, the recesses in the palm disappear, and each finger becomes a smooth tapered block. A gripper like this closes on an object using exactly the features that the hulls erased.
This is normal practice, not sloppy authoring — most engines require convex collision geometry, so URDF authors ship hulls (or a convex decomposition) as a matter of course. SuperDex Physics has no such restriction: it simulates non-convex collision geometry directly. There is no reason to inherit that approximation, so for contact-rich parts set the collision Source to Visual and let Studio build accurate colliders from the detailed meshes.
A URDF references its meshes by <mesh filename="...">, and there is no single
convention for what goes in that string. Studio's importer tries the common
ones, in order, and takes the first file that actually exists on disk:
package://<pkg>/<path>— the ROS convention. Studio walks up from the.urdflooking for apackage.xmlto locate the package root, then resolves<path>beneath it.package://with nopackage.xml— common in datasets that strip it, or inxacro-generated exports. Studio walks up the directory tree from the.urdfand resolves against each ancestor, closest first, matching either an ancestor directory named<pkg>or the path sitting directly beneath one.package://with the package segment omitted — malformed but common (e.g.package://meshes/link.stl). The remainder is resolved as-is against each ancestor.- Absolute paths — used directly. Unlike the cases above, an absolute path that does not exist is reported as an error in the Log Console.
- Relative paths — resolved against the
.urdffile's own directory.
Whatever the URDF actually wrote is preserved either way, so a reference that cannot be resolved shows up in the wizard as a missing mesh with its original text, rather than silently reading as "no mesh here".
Remesh and Bake SDF
Two checkboxes refine the collision meshes as they are converted. Both use default parameters — you can fine-tune either one per model after import in the Model Editor.
| Option | What it does |
|---|---|
| Remesh | Rebuilds the surface into a clean, watertight collision mesh. Raw URDF meshes are frequently open, self-intersecting, or needlessly dense, none of which simulate well. |
| Bake SDF | Computes a signed distance field and stores it alongside the collision mesh. SDF colliders give SuperDex Physics fast, stable, dense contact — this is what you want for contact-rich manipulation. |
Both only apply during conversion, so they gray out if the collision models are being copied rather than converted.
Per-link control
If the blanket choices are not enough — say one link's visual mesh is missing, or a single gripper finger needs different treatment — the Render Models and Collision Models tabs expose every link individually.
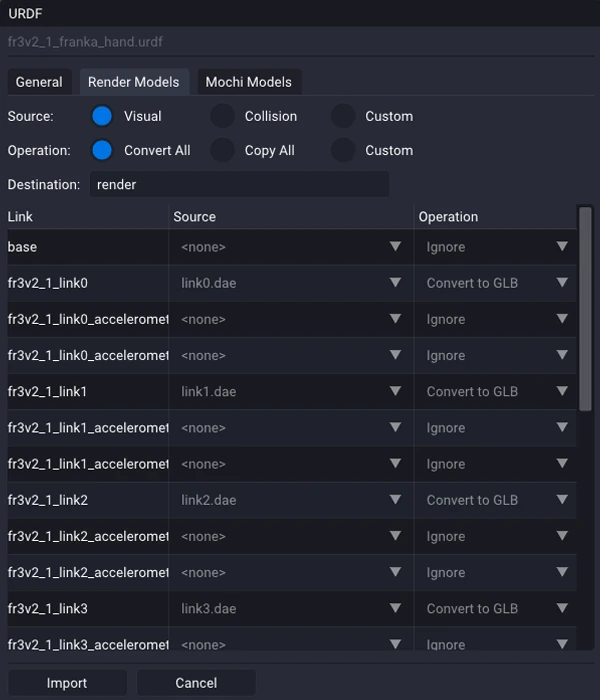
.glb output.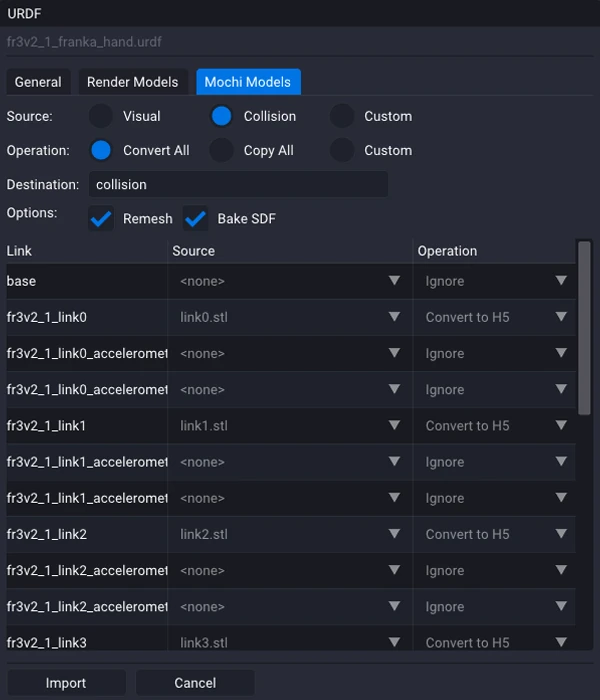
.mochi.h5 output.Each tab repeats the blanket Source and Operation rows at the top, and adds a table with one row per link. Selecting Custom on either row unlocks the matching table column so you can configure links one at a time; the other choices overwrite every row, so switch to Custom before making per-link edits.
Per link, Source picks between that link's visual and collision mesh, and Operation is one of:
| Operation | Result |
|---|---|
| Convert | Run the mesh through the conversion pipeline into .glb or .mochi.h5. |
| Copy | Copy the source file through byte-for-byte, no conversion. |
| Ignore | Produce nothing for that slot — the link gets no render or no collision model. |
A warning icon marks any link whose selected mesh is referenced by the URDF but missing on disk. Those links import with that slot left empty rather than failing the whole import.
Import
Once the options are set, press Import and Studio begins processing the
meshes in the background, reporting progress as it goes. When it finishes, the
new .superdex_bot appears in the Asset Browser. Double-click it to open the
bot and inspect the imported render and collision geometry.
Where to go next
- Editing — open the imported bot, work through its hierarchy, links, joints, and contact.
- Model Editor — refine an imported mesh. Re-run the modifier stack, tune the remeshing, and rebake SDFs on any collision model the importer produced with defaults.
See also
- Bot Editor — the rest of the bot workflow.
- Model Editor Guide — the modifier stack that builds collision geometry.